
Friday, 30 November 2012
Production - Completion of the music video
PRODUCTION- FINAL thoughts on final music video
PRODUCTION- FINAL thoughts on final music video
Overall i feel that our music video went well, although there was a lot of stress about it there were many pros and cons of our editing process. As a group we made sure we got all the effects, cuts , transitions etc in order for us to get high marks for our music video. When filming for our music video we had to film a lot of footage from different locations, where some of the footage worked and some were not so useful, we took the risk doing this as we wanted to use more than just one main base track so we could try get more marks. Before uploading our video we wanted to make sure everything was perfect before we said our final goodbye until december the 18th where we see our video for the last time. Overall i enjoyed the editing process although this was a lot of stress and handwork i hope that the hard work paid off. Below i have presented what we did overall presenting pictures of the locations we used and our final editing process.
.
PRODUCTION- Finished editing
PRODUCTION- Finished editing

Today we finally finished our editing for our music video which put me through stress during the last couple of weeks. Before making sure we were finished we showed most of the media teachers to see what they thought and to see wether there would be anything else we could do to make it perfect. Most of the teachers said it was fine and was ready to upload. With JOY we were then able to write finished in the box ready for us to watch it once more in the cinema on the 18th December
Production - The ending of our music video
Originally our idea to end our music video was to show a sunset however, whilst editing the music video and showing our peers, a good way they said to end the video was to show our artist laughing. So we found a few clips of him smiling and chose one to end on. However, we thought about combining the idea and because one of the main effects we included throughout the music video was changing the opacity of the clips so, we could place them on top of each other. We thought we should finish with 2 or 3 clips on top of each other. This would involve a sun set and our performer laughing or smiling.

Whilst doing this we also had one of the clips ending with the camera going down showing the end of filming. As a group we thought this looked really good and different so we decided to keep that in. It puts more emphasis on the ending of the song so we chose to include it.
It also reminded us of the music video 'OMG' by Usher. In the end of that music video the T.V turns off so it emphasizes that it is the end of the music video. We thought since the target audience for this music video is similar to the target audience for out music video it would look good.

PRODUCTION- Edit ending of footage
PRODUCTION- Edit ending of footage

Below i have illustrated the video which this main inspiration came from, followed by screen grabs of parts which we followed.
Thursday, 29 November 2012
Production - The beginning of the music video
Our original idea of how we wanted our music video to start was of our artist in a shadow. This was because the song didn't start straight away but had a 4/5 second silence at the beginning. We tried out different effects and transitions.
 Because we thought the beginning was a bit too random we decided to fade into the close up of our artist doing the roof base track. We felt this a much stronger opening and identifies our artist straight away.

Production - Editing using colour correction

PRODUCTION- Editing green screen
PRODUCTION- Editing green screen
During todays lesson of editing we recorded ourselves removing the green screen from the scenes which they were on. Doing this was challenging and new to us as a group, we found this task very interesting as we were able to experiment with the colours trying to remove the green screen to a plane background. Overall as a group we found this task interesting and fun to experiment with as we were able to play around with the colour contrast and also the softening and sharpness around the character.
As shown above we have created a recording of us editing on the green screen using camtasia we have also spoken whilst editing so that you are aware of what is going on and how the process is completed.

PRODUCTION- Editing
PRODUCTION- Editing
Here is shown to be footage which we took to show our artist looking at our video giving us his thoughts and dislikes of what he thought went well and what we could improve on.
Wednesday, 28 November 2012
Production - More editing needed
After looking at our rough cut with the class we knew we had to edit a lot more. A main problem with the rough cut is the lengths of the different base tracks, they go on for too long. So we knew we had to involve more cuts between all of the different shots we had.
Putting in more cuts and transitions would make the music video a lot more interesting, it will also help editing to the beat. So when a fats beat comes we involved more cuts. The fast cuts makes the audience feel more involved with the fast beats to the song and feel we have done this well.
When we were going from a verse to a chorus we included a fade out. This made the music video look really nice and smooth and the two clips we used went well together.
PRODUCTION- Editing Continued
PRODUCTION- Editing Continued

I feel that the previous evaluation of the video me and hafiza done helped us see what we thought was needed as at this stage our video was all over the place where the shots were in places they shouldn't have been. So when looking at the video and noting down the errors and the changes in which we would need to make helped us organise ourselves more as well as arranging and removing the random clips which were not needed.
Below i have shown some of the editing process where we had removed one base track adding more cuts and another base track of our performer singing due to them being long.

PRODUCTION- Edit Final Stages
PRODUCTION- Edit Final Stages
 Both me and my team member thought our video was good however needed to be watched over again due to us thinking that the scenes which we had were not matching the song we thought some of the footage we had was random and was misplaced. We both thought as a group it would be good to take a piece of paper watch what we had so far and note down what it was we needed to touch up on and how we could re arrange the clips we didn't need. When watching the clip back 2 we came up with a list of things which we needed to change and fix in the video. Once we made the list we then started editing what was down ticking off the ones which we done leaving us to finish off what we needed. When finally finishing the parts which needed fixing we found out that we didn't record the traffic scene which was needed for the background for one of the base tracks this therefore lead for us taking the camera out on the same day and filming the traffic at night time so that it was ready when editing the next day.
Once we filmed the traffic scene we came back to our list till all the ideas which we had to amend on were all ticked. Doing this was very helpful as we as the audience were able to watch the work we did then look at what was disappointing and what needed to be improved on
Below i have shown the checklist which both me and hafiza created , and also a video of the editing process on final cut this also helped us when going back to the editing process.
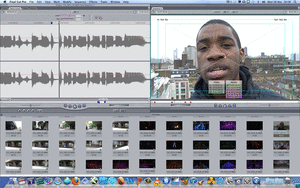
Production - editing continued
The picture below is a screen shot of our music video being edited. As you can see the length of some of the clips at the end are quite long so we need to involve more cuts and change to different base tracks or other scenes. I think more cuts on the beat needs to be involved and when the song begins to get faster we should put in scenes that build upto what is going to come next.


Production - Watching back our footage
A good tip we got whilst editing was to just stop editing and watch the whole music video back. This was useful because we were editing the music video bit by bit so weren't to sure if things really fitted in or if there was something wrong with the beginning. Whilst we watched it back i had a pen and paper ready so i could take notes on what we need to fix up so we don't forget.


The image above is the list i created with Ipek when we were watching back the footage. This helped us to remember the things we need to touch up on and once we fixed up the things on the list we would tick them off. Some of the things on the list were 'GS of Ralph'. The 'GS' stood for green screen which we still have to edit.
Tuesday, 27 November 2012

Music video meaning
A question i have been getting recently is what is the story behind our music video? What i fee the message or story is that our music video will tell is mostly of our artist and him being young and enjoying life. The lyrics to our song say 'when you finally find whats beautiful, its so wonderful'. To our artist what he thinks is wonderful is him enjoying his time with his friends and having fun. Also as well we will try to involve another message suggesting that everyone is beautiful/wonderful with the way they are. This will be presented with the 3 additional performers that we have chosen.
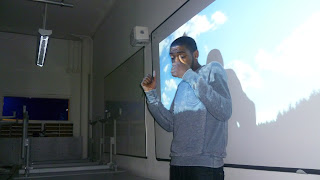
Production - Extra footage
The extra footage we decided to film was with using the projector. This was inspired by Rihanna's music video 'We found love'. The ideas we thought of to project was things that were wonderful and beautiful just like the lyrics to our song. Below are some pictures we took whilst filming our projected footage. We decided it would be easier if our performer sang most of the lyrics of the song especially the chorus because it is very repetitive within our song. This would make it easier for us to pick the best parts of the performance but also have a choice to pick what would look good.


Production - Beginning to edit
Beginning to edit is exciting we have got so many clips and i cant wait to put everything together. I think that we should begin to edit with our base tracks, this includes sorting out all the lip-syncing and making sure its on point. This will be done using markers.
Production- Skills development AS - A2
The planning of my music video was very different compared tot he planning in AS. I feel a lot of the planning in A2 was independent and in our groups whereas is AS we did a lot of class work to begin with. Like many teenagers i watch music video's all the time so it helped whereas whilst we were doing thrillers i wasn't a big fan on them and didn't really find the openings to movies interesting.
At the beginning of our planning we learn three theories which were Andrew Goodwins, Laura Mulveys and Caroll Vernallis' theory. All three theories gave us an insight of what music videos contain and even though we watch them all the time we may not see the difference between many music video's. This was a good guideline so we could chose which kind of music video we wanted to create.
Music video's differ, some go with the lyrics whilst others may be completely random. This allowed us to be very creative whilst planning our music video unlike in AS where we had to pick the type of thriller we wanted to do which in my case was a psychological thriller. To make it seem like a psychological thriller we had to make sure our footage would go with the genre. Our target audience was older women aged 30+ so we had to make sure our camera shots, mis en scene, editing and sound went with our genre and would fit in with our target audience.
For my music video however i kept the target audience teenage girls like myself. This allowed me to have more fun with things such as camera shots, mis en scene, editing and of course the song which i like. Because we kept our core audience teenage girls 16-21 who like to have fun and enjoy time with their friends we as a group knew what our core audience would like to see.
Moreover, with the time we had to create our music video was much shorter than the time we had to create our thriller meant we had to use a lot of our time outside lessons getting everything we needed. Unlike AS where most my work was done during lessons with my group this year we had to meet up during our half term to shoot most of our shots.
PRODUCTION: Edit- How cuts can be used
PRODUCTION: Edit- How cuts can be used
Cuts are essential when making any sort of media work and can be used in many ways. It is shown to be important to add cuts as without them the video overall will be boring and have no excitement to it. Below i have created an interview through go animate to show the types of cuts used and why we use them and an overall summary showing why i think cuts are essential.
Video Maker - Powered by GoAnimate.
PRODUCTION: Edit- Sum up our video in one word
PRODUCTION: Edit- Sum up our video in one word
 I have used wordel to illustrate some words which illustrate and link with the music video. Most of the words gathered tend to be happy words as this is an upbeat song that our audience like. Recapping on this we were able to go back and see wether we have attended to match our audiences expectations of what they would expect and would like to see. So far we have matched there expectations of the video being fun and interesting to watch. Below is a brainstorm i gathered to illustrate some words which link with how / what our music video is about.
Overall this was useful as i was able to recap on our audience task and see wether the expectations they wanted were presented in our video. At the beginning of researched i gathered what people / our audience would expect to see and now i have brainstormed what we have included.
PRODUCTION: Audiences Expectation
PRODUCTION: Audiences Expectation
The audiences expectation when they watch our music video tends to be what we expect. Our music video is aimed at young teenagers like myself. When researching we found boys didn't like the song we chose much due to them identifying it as being too 'cheesy'. The audience expectation of what they planned on seeing when asking them before we started filming was of people having fun , being young, enjoying life and living the life of young people. Most of what the audience expected was shown in our music video which we were proud of. When showing our footage back to people/ teenagers my age they overall thought the footage used was great and fun making them want to join in with the song. Below i have indicated what the audience expected to see and the scenes which showed this.


PRODUCTION: Edit- Feedback what to improve
EDIT- Feedback what to improve
In lesson today Rebecca watched our video and gave us constructive criticism on what she thought would be a good idea to change. We were told that the base track we were going to use should be changed to another one as she though worked better than the one with the performer behind the green screen. We took this on board and once we played back the footage with another base track went well.
As well as rebecca an x media student who is now creating music videos had also watched out video. when watching our music video he thought that the base track as well as the projected images worked well with the song and the edits which we put in went with the beat of the song, he did however say that some of the green screen footage which we did take shouldn't be used due to the fact that it didn't work well with what was going on. Overall however he thought the edits and shots we took were really good especially the skatepark scenes which we did also in reverse.
PRODUCTION: Edit- Adding Cuts and transitions
EDIT- Adding Cuts and transitions
 Adding cuts and transitions was another main aspect when editing our music video. Cuts and transitions were what made the music video more interesting and fun to watch. We made sure we didn't use a lot of jump cuts as these were seen to be obvious edits which we were told were boring and too obvious to use. Transitions included effects such as fade in and fade outs. These were used to make the transition from one scene to the next smooth and effective. When editing our music video we used these transitions as well as fades as we thought this went well with our music video as our song is fast.

The cuts when we were editing had to be quick as our song was fast so at each beat we had to make sure there was a cut as well as a transition to make it exciting for the viewers to watch.
PRODUCTION: Edit- Moving around scenes (change ideas)
EDIT- Moving around scenes (change ideas)
When editing we thought the scenes which were in place, would been a good idea to change them round as most of the scenes made no sense where they were previously. Not only did we change some scenes around but as a group we thought it would be a good idea to repeat some of the scenes which we had already placed in the beginning near the middle. These shots were shots from the skate park. When moving and copying these scenes we had to again make sure that the scenes were locked in place when doing this, this was because when deleting at some stages some of the clips shifted which therefore resulted in the lip sync to not match. When changing our ideas again we used the markers to help us identify the places which we wanted to place them in and then dragging them into place when making our final decision.


PRODUCTION: Edit - Continuing editing
EDIT - Continuing editing
Once we had uploaded our rough cut and received feedback from our class members as well as the teachers it was time to continue and go back to editing taking all the constructive criticism on board. When going back to editing we thought it would be a good idea to start removing the green screen as the main question that was asked was what would go behind the green screen which we still was unsure about, we then thought as a group instead of us using the green screen base track as the main one we used the roof scene which people thought was a good idea and effective.
We also added more markers when inserting clips which we needed for when the beat of the music had dropped the markets were form every 4 seconds to every 2 seconds with cuts in between.
When adding and changing around what we thought was in the wrong place we had to delete those clips from where they were currently at when doing this the clips that were in place shifted meaning that the lip sync no longer matched to avoid this happening we had to lock the following items/ clips into place so that they wouldn't move when deleting the following clips which were not needed.


Monday, 26 November 2012

PRODUCTION- Filming the traffic
PRODUCTION- Filming the traffic
One last bit of filming we had to do was filming the traffic, this is going to be the background of our green screen footage. We wanted it to be dark and quite busy so went o film this scene in Angel.
Production - What we want the audience to see
When our music video is being watched we want them to enjoy the it. What they would want to see is quite is for us to understand because our core audience is female girls aged 16-21 including young adults and we can relate to what they are expecting to see. What we are hoping to show through the music video is a fun video of our artist and his friends enjoying themselves. We have to also make sure the editing like transitions and cuts go well with the flow of the music. Different shots of our artist is also expected to be seen so we made sure we filmed a few different shots. Below i have included pictures of different shots being taken of our artist and shots of our artist with friends having fun. Also as well teenagers at the skate park having fun.

 |

Sunday, 25 November 2012
Production- Evaluation of roof

Production- Evaluation day 2 filming
With our kings cross location we had to visit this location because the first day we went there the water fountains weren't working but instead of wasting the day we decided to film a base track. Again the base track was filmed on a tripod so there wasn't any movement of the camera and so i don't think it looks very good. The second time we got more footage of our artist having a bit more fun whilst the fountains were working, he even decided to sing whilst in the fountains. The footage that came out looks okay but unfortunately we were unable to get other people to come at this time so didn't get all the shots we wanted to.


Production - Evaluation Southbank footage
The footage we collected was very good. The tricks we collected of our performers was good and we were able to get them in different angles. The shots we took from under the roof didn't look so good because of the lighting which meant we could only get footage from one side of the skate park. I think the background of the skate park with the graffiti looks really good so i feel this was a good location we picked. We also collected a base track with a graffiti background but it was taken on a tripod so there was no movement within these shots so i don't think we will be using it in our final music video. The people at the skate park were really nice and allowed us to film them when we told them it was for our media course work. We made sure we filmed enough so that we can choose the best clips when we edit it.
Saturday, 24 November 2012
PRODUCTION: Edit- Videos and ideas of green screen
 Overall as shown above i have collected a wide range of images which most videos use both on the green screen and on the projector. The ideas from most of these videos is what influenced us the most as they were colourful and eye catching suiting our target audience once again,
EDIT- Videos and ideas of green screen
Here as shown are some ideas which influenced us on the green screen.Most of the green screens used in the videos are shown to be still images mostly of graffitis or others but mostly based on a still image. Some as shown below on the other hand tend to leave the background plane. When using the green screen we though we would use still images such as plane graffiti scenes and also beautiful images. As well as the green screen we also used the projector to enhance the images we wanted to be shown of the footage we took such as fireworks and also time lapse of clouds and growing flowers over time
Production - Editing Putting in close up's
After getting feedback on our rough cut, one of the main constructive criticism we got was to include some close up's of our artist. As a group we decided to go with the close up shots that was taken on the roof. On our story board many close up shots were included so we decided to follow that. Therefore we also started off with a close up on the artist.

Production - Evaluation of how i feel the rough cut went
Overall i'm glad we were able to edit the whole song and meet the rough cut deadline. However, whilst watching it back on the interactive white board i noticed many things that i wanted to change. One of the main things was how often we used the green screen base track. We were unsure of what we were going to use as the background but after searching as a group we concluded we would use traffic and have it sped up.
Production- Permision to film on the roof
To be able to film on the roof i had to get permission from a few people. I had to go to on of the heads of the college, i was able to get permission from Paul the Deputy head of the college. I then had to get permission from Steve Hanson who is in charge of our college facilities. He said i would be able to if i get permission from my teacher and that they would be on the roof with us. I also had to write up a risk assessment and give that in to them.
Production: Permission to film at Kings Cross
Whilst we were about to film at Kings Cross we were approached by a someone who works in the area and told us we had to get permission and gave us a form to fill out. The form consisted of contact details, reasons for filming and what it would be used for and a signature.


Planning: Using the projector
The images i have collected below are from Rihanna's 'We found love' music video. In her music video she uses projected images involving clouds, a field, fire and Japanese writing.
 This gives us a good idea of the kind of things we will be looking to do. we will be looking to involves beautiful/wonderful things that will go nicely with our music video. Looking at the projected footage in this music video makes it look really interesting and keeps the viewer engaged. The reason why i wish to use projected footage in my music video is because i feel it will make it look really interesting and it allows us to use images that will be hard to film with our artist really there.

Research: Music vids using green screen

Planning: Green screen backgrounds
Some our shots will be taken on the green screen and so we will need to add in backgrounds behind our artist. The backgrounds that we thought may look interesting were traffic sped up, clouds, lights, stars, sunset and a plain white background.


Friday, 23 November 2012


PRODUCTION: Edit - Rough Cut
EDIT- Rough Cut
Here is our rough cut which we had presented to the class followed by some feedback to help us improve when we come back to editing
 |
| Tick by group 29 to show we've done our rough cut |
Production - Rough cut feedback
We watched our rough cut as a class ad it was good to see what our music video looked like on a big screen. We got both positive and ways to improve feedback. Some of the positive things were the use of locations and how they it in with our genre. Also people liked the editing and the way we used slow motion and footage played backwards.
There are quite a few things that we need to improve on and these are to edit out the green screen footage so we put in a background. We also need to tighten up the lip sync because some bits near the end are out of time. watching the video back i notice a lot of things that i would like to change like some of the placings of the video.
Being able to watch the rough cut as a class tells me that i have a lot of work still to do. It was a nice way to get feedback from both pupils and teachers to see how we can improve.
rough cut feedback by hafiza_m on GoAnimate
Animated Presentations - Powered by GoAnimate.
Thursday, 22 November 2012
PRODUCTION: Edit - Evaluation of editing so far
EDIT- Evaluation of editing so far
So far the editing for our music video is going well. Due to the rough cut deadline we are now able to see the types off footage missing and the scenes which we need to add in order to make it successful. With the feedback which we have also received we feel like we are on track but need to do more close ups and think of also using another base track. From the rough cut feedback also we plan to edit more onto our music video to make it as best as possible below is a prezi (presentation) of editing so far.
PRODUCTION- Blog post that i wish to put more effort
Blog post that i wish to put more effort
I feel the blog on locations wasn't my best and wasn't my worst but i feel i could have recorded more clips when traveling to our location.
- I could have recorded on the flip cam whilst travailing to ALL locations
- I could have Interviewed people on what they thought of our storyline, people who connected with our audience.
- Looked clearly at the locations we were filming at
- Checking the weather
- Asking peoples opinions and views on the storyline
- Taken more stills of us meeting the performer and of us traveling to and from our locations.
Overall we did the points we stated but feel i could have taken more stills and videos of us traveling to our location and us also meeting our performer. Although i didn't get a lot of flips on the location i have one showing us travailing to south bank and a shot clip of us meeting our performer.


PRODUCTION- Blog post most proud with
Blog post most proud with
The blog i am most proud with is the production blog of me gathering 'beautiful' 'wonderful' objects. This for me was a highlighted blog where i was able to gather images and information on objects which related to these terms. This for me was a highlighted blog as i enjoyed collecting the images which related to these terms. Most of these images also interested and gave me ideas of what we could also use. Gathering these images made me see the types of things we could use for these words as we see they are referred to continua sly though out the music video. This blog influenced my decisions when disguising as a group what we though would suit the theme well. As well as collecting images such a flowers and arts i also linked it to what teenagers our target audience like such as cakes and other foods and hobbies they are interested in such as nail varnish.
Over all this blog was useful and was one i found fun as gathering the images and speaking about them was interesting as i was also able to put forward my views of images and ideas of be being the audience, the thoughts of what i find beautiful and wonderful.
When doing this blog i imagined that there was no music video to the song which made me think beyond the concept. I had also gathered an questionnaire which gave me clear responses of what people liked who were aimed at my audience where i was then able to add images of things in which they stated in the questionnaire i gathered 'beautiful' 'wonderful'.


PRODUCTION- Targets set for my blog
Targets set for my blog
When speaking to the teachers as well as memebers in our class:
- Use more technology
- Dont do blogs in to much detail
- Reflect upon progress
- Use other sources such as prezi, photo bucket etc

PRODUCTION: Edit- Feedback from ROUGH CUT
Feedback from ROUGH CUT
Today we showed our rough cut to the class. We received a lot of feedback from the class both positive and negative points. Many members in the class thought that our video was well done as they liked the shots we took and how well it went with the timing of the song. Some on the other hand thought that more shots were needed. The rough cut was a good way for us to see how it looked big on screen and the things in which we missed out which as a group we saw a lot of footage which were in the wrong place and where some of the scenes didn't fit well with the performers lip sync. But the rough cut overall helped us as a group identify errors for our self and also taking constructive criticisms on board. Below i have recorded a video of people giving there feedback once we finished presenting our video to the class followed by an animation of some shots shown in the video.
PRODUCTION: Edit - Using the projection screen
EDIT- Using the projection screen

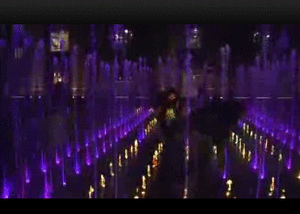
As our music video is upbeat and we needed a projection screen in order to make the video more exciting. As our music video is upbeat we needed to use scenes of moving images behind our main performer such as moving stars words etc. When filming with the projection screen over the performer it looked really well as it went with the beat of the song well. As shown opposite here is a clear example of a projection.
Projection footage overall is shown to be effective as shown below are key examples and ideas of way kind of projections have been used as we can see the projection reflects onto the characters face making it seem more effective and real when the music is being played. As the music is also up beat it goes with the sequence well making the audience engage with the story more.

Here are some projections we had used when filming our performer in front of the projector screen which was very effective and also successful. Over all our footage in the projection screen went well as we got what we wanted which we hope comes out ok on our video. We filmed a variety of base tracks in front of the projector with different images which we plan on using later on in our video some are illustrated below.


PRODUCTION: Edit- Final cut adding markers
EDIT- Final cut adding markers
Adding markers was one important step when starting to edit our music video. Markers gave us a head start in where to start with our video. Before we started anything as a group we inserted the audio track of our song and then we started marking the track according to the beats. When marking we used the 'M' button to import markers whilst listening to the track to help us when we come to putting the clips on. The markers we used gave us a head start. We placed the markers every 2 seconds for the 3;14 song. Each marker stopped at a beat of the song where we then later on added clips. When we inserted the clips we cut them down using the 'I' and 'O' key then dragging them into the place which we wanted them to go.
Markers were very useful when we needed them to help us stick to the lyric line we wanted for example when we needed to pause the song on 'exhale' we used a marker to then import the clip we wanted on that particular line of the song.
As shown below i have print screened some clips from final cut showing the markers which we added and how it helped us when dragging the clips into place.


PRODUCTION: Edit - Lip Sync base-track
EDIT- Lip Sync base-track
 The lip sync of our main performer wasn't that bad. I feel the lip sync over all was very good for a male performer as the lip sync matched the songs lyrics very well. We done a variety of base tracks of our performer singing which came out very well. Our main base track was of the performer in front of the green screen where we did a low angle shot of the performer, this base track was seen to be the best as we see the performer got into the song and acted like a performer does in music videos. We also did base tracks of the performer in front of the projector where we had different images moving around such as stars words and also moving objects to create some tension. All these base tracks we filmed more than once in order to make sure that the lip sync of the performer was on point and was good enough. When doing the base tracks we clearly saw that the performer got into the song and felt comfortable in front of the camera after the first go.
When editing it wasn't very hard to match the performers voice with the main artist as we were able to hear our performer sing which made it easier for us to match it together with the actual song. We did this by adding markers to the base track and matching it with the performers voice. Once we had matched the vocals of the performer with the main song we then muted the sound of our artist so that all we could hear was the song.


PRODUCTION: Edit - Changing green screen
EDIT- Changing green screen
Our main base track was in front of the green screen where we filmed the performer with a low angle shot to see the action and moves taken place which we thought as a group was effective. When changing the green screen background we had to click the part of the clip which we wanted to change and then click onto effects, key crommer key. Once we selected crommer key we then selected the painter key and selected the colour to black removing the green colour from the back of our performer till we were left with just a black background. Once we had got the black background we then inserted the clip we wanted above it to create the effect behind our main performer.
Doing this was a challenging process as we had to play around with the colours to make sure that there was no green colour left in the background.
We also needed to soften the edges so that the outline of our character was smooth and not rigid. This was important as when we played it, looked obvious that the artist was cut out and placed on a background, smoothing the image made it more professional and more clear fitting in with the background well.
The negative aspects of this was the fact that once we had added the effect on the background the project took a long time to render approximately around 25 mins
When changing the green screen another bad aspect of this was the fact that we were only sure if the background worked once we had finished moving the colour and rendering that clip. If the clip didn't match then what we did was a waste of time. We found out when doing one base track which was filmed on a low angle didn't work as the artist looked like he was flying in the background so for this we had to create another base track which overall went well with the flowing background


PRODUCTION: Edit- Using Final cut inserting footage
EDIT- Using Final cut inserting footage

Final cut was the software we used when strting to edit our music video, the first step we had to do was to transfer all of the clips which we had filmed onto the video drive into folders which indicated clearly the locations where we had filmed. Doing this made us more organised so that when looking for clips in the locations we were able to find them easily. We had to transfer some of the footage onto my laptop as no space was left on the memory card when we were filming which we had to also transfer onto the video drive. Once all the clips were inserted into there correct folders we then as a group started picking the ones which we thought were good and highlighters them in orange.

When looking at the clips we had a lot which were the same 'duplicates' as a group we took a lot of time deciding those which were essential and those which were not needed we thought a good idea would be to highlight the clips which we needed as it helped us see where we were at and which ones will go well with out music video. When selecting the clips it also helped us see how many we were planning to use where we then had to narrow them down. Wd had done this with every location narrowing down the footage we took and only highlighting the ones which were important.
Once we had decided the clips we wanted to use we then imported them onto final cut ready to start dragging them into there places and ready to edit.
Subscribe to:
Posts (Atom)